

Challenge Report: Mounting and Analysis of Forensic File Systems
Author: Portelcore Team Date: October 16, 2025 Operating System: Fedora Linux
Author: Team Portelcore Date: October 16, 2025 Operating System: Fedora Linux
Practice Objective
Sección titulada «Objetivo de la Práctica»The main objective of this practice is to acquire the necessary skills to mount and analyze disk images in different formats (RAW, E01, VDI) in both Linux (Fedora) and Windows operating systems. The focus is on the application of forensic techniques, ensuring at all times the integrity of digital evidence through read-only mounts and the use of specialized tools for data analysis and recovery. We will execute these techniques to ensure that we can analyze file systems effectively and safely. We must follow established procedures to guarantee evidence integrity and will perform the mounting and analysis of forensic file systems according to practice standards. We will use specialized tools for data analysis and recovery, and download disk images in the formats necessary for analysis.
Part 1: Analysis and Mounting in Linux (Fedora)
Sección titulada «Parte 1: Análisis y Montaje en Linux (Fedora)»This section details the procedures performed from a Fedora terminal to access the content of the provided disk images.
1.1. Mounting a RAW Image (imager-dd.000)
Sección titulada «1.1. Montaje de una Imagen RAW (imager-dd.000)»The RAW image, in .000 format, is a bit-for-bit copy of the original device. To analyze it, we must first identify its partition structure and then securely mount each partition.
Tool: fdisk - Disk Structure Analysis
Sección titulada «Herramienta: fdisk - Análisis de la Estructura del Disco»fdisk is a command-line utility that allows viewing and manipulating the partition table of a block device. It is the essential first step to understanding how the disk is organized.
Procedure and Results:
We will execute fdisk with the -l option (list) on the image file to obtain its partition table.
sudo fdisk -l /run/media/user.portelcore/USB-Desti/imager-dd/imager-dd.000Result Obtained:
Disk imager-dd/imager-dd.000: 3,75 GiB, 4027580416 bytes, 7866368 sectorsUnits: sectors of 1 * 512 = 512 bytesSector size (logical/physical): 512 bytes / 512 bytesI/O size (minimum/optimal): 512 bytes / 512 bytesDisklabel type: dosDisk identifier: 0x94d50d34
Device                      Boot   Start     End   Sectors  Size Id Typeimager-dd/imager-dd.000p1           2048 2099199   2097152    1G  b W95 FAT32imager-dd/imager-dd.000p2        2099200 4196351   2097152    1G  7 HPFS/NTFS/exFATimager-dd/imager-dd.000p3        4196352 7866367   3670016  1,8G  5 Extendedimager-dd/imager-dd.000p5        4198400 6295551   2097152    1G 83 Linuximager-dd/imager-dd.000p6        7323648 7866367    542720  265M 83 Linux
This output provides us with crucial information: the starting point (Start) of each partition in sectors and the total size of each partition (Sectors). This information is indispensable for the next step.
Tool: mount - Partition Mounting
Sección titulada «Herramienta: mount - Montaje de las Particiones»mount is the standard Linux command to attach a file system to a directory (mount point). For forensic analysis, we use specific options to ensure integrity:
o ro: Mounts the file system in read-only mode.offset: Specifies the offset in bytes from the beginning of the file where the partition starts. It is calculated as:sector_inicio * tamaño_sector.sizelimit: Limits the size of the mounted device. It is crucial to avoid theoverlapping loop device existserror when mounting multiple partitions from the same image file.
Procedure and Results: We will create mount directories and proceed to mount each partition by calculating the corresponding offset and sizelimit.
# Creación de directorios en /mntsudo mkdir /mnt/p1 /mnt/p2 /mnt/p5 /mnt/p6
# Montaje de la Partición 1 (FAT32)sudo mount -o ro,offset=$((2048 * 512)),sizelimit=$((2097152 * 512)) /run/media/user.portelcore/USB-Desti/imager-dd/imager-dd.000 /mnt/p1
# Montaje de la Partición 2 (NTFS)sudo mount -o ro,offset=$((2099200 * 512)),sizelimit=$((2097152 * 512)) /run/media/user.portelcore/USB-Desti/imager-dd/imager-dd.000 /mnt/p2
# Montaje de la Partición 5 (Linux)sudo mount -o ro,offset=$((4198400 * 512)),sizelimit=$((2097152 * 512)) /run/media/user.portelcore/USB-Desti/imager-dd/imager-dd.000 /mnt/p5
# Montaje de la Partición 6 (Linux)sudo mount -o ro,offset=$((7323648 * 512)),sizelimit=$((542720 * 512)) /run/media/user.portelcore/USB-Desti/imager-dd/imager-dd.000 /mnt/p6
After executing these commands, the content of each partition will be accessible through its respective directories in /mnt, allowing for the safe exploration of files.
1.2. Mounting an E01 Image (EnCase)
Sección titulada «1.2. Montaje de una Imagen E01 (EnCase)»The E01 format is a forensic standard that encapsulates the RAW image along with metadata (case number, examiner name, etc.) and verification hashes (MD5, SHA1) to ensure its authenticity. To mount it in Linux, we need special tools.
Tool: ewfmount (from libewf-utils)
Sección titulada «Herramienta: ewfmount (de libewf-utils)»libewf-utils is a set of tools for working with images in EWF (Expert Witness Format). Its main tool, ewfmount, acts as an intermediary layer: it "opens" the .E01 container and exposes the internal RAW image as a single virtual file (usually ewf1), which we can then analyze and mount as a normal RAW image.
Procedure:
-
Installation on Fedora:
Ventana de terminal sudo dnf install ewftools -y -
Creating a mount point for
ewfmount:Ventana de terminal sudo mkdir /mnt/ewf_mount -
Running
ewfmount:Ventana de terminal sudo ewfmount /run/media/user.portelcore/USB-Desti/image-ex01/image-ex01.E01 /mnt/ewf_mount -
Verification and Mounting of the Internal Partition: Once executed, a
ewf1file appears within/mnt/ewf_mount. This file is treated as a RAW image. To mount its first partition:Ventana de terminal sudo mkdir /mnt/particion_e01sudo mount -o ro,offset=$((2048 * 512)) /mnt/ewf_mount/ewf1 /mnt/particion_e01
This process allows access to E01 images directly from Linux, leveraging the command-line tool ecosystem.
1.3. Mounting a Virtual Machine Image (VDI)
Sección titulada «1.3. Montaje de una Imagen de Máquina Virtual (VDI)»It is common to have to analyze a virtual machine's hard drive without starting it. QEMU tools allow us to do this.
Tool: qemu-nbd (from qemu-img)
Sección titulada «Herramienta: qemu-nbd (de qemu-img)»qemu-nbd is a tool that allows connecting a virtual disk image file (VDI, VMDK, QCOW2, etc.) to a network block device (NBD, Network Block Device) in the Linux kernel. For practical purposes, it makes the operating system see the file .vdi as if it were a physical hard drive connected to /dev/nbd0.
Procedure:
-
Installation on Fedora:
Ventana de terminal sudo dnf install qemu-img -y -
Loading the kernel module:
Ventana de terminal sudo modprobe nbd max_part=8 -
VDI image connection:
Ventana de terminal sudo qemu-nbd --connect=/dev/nbd0 /ruta/a/la/imagen/virtual.vdi -
Mounting a VDI partition: The system now exposes the partitions as
/dev/nbd0p1,/dev/nbd0p2, etc.Ventana de terminal sudo mkdir /mnt/vdi_particionsudo mount /dev/nbd0p1 /mnt/vdi_particion -
Safe Disconnection (Very Important):
Ventana de terminal sudo umount /mnt/vdi_particionsudo qemu-nbd --disconnect /dev/nbd0
1.4. Partition Recovery with TestDisk
Sección titulada «1.4. Recuperación de Particiones con TestDisk»TestDisk is a powerful data recovery tool designed to recover lost partitions and repair damaged partition tables.
How TestDisk Works
Sección titulada «Funcionamiento de TestDisk»TestDisk does not rely on the existing partition table. Instead, it scans the entire disk at a low level looking for "signatures" or headers of known file systems (FAT, NTFS, ext4, etc.). When it finds one, it interprets it as a possible partition start. The result is a list of all partitions that have existed on the disk, including deleted ones. We must identify which ones are correct to rebuild the partition table.
Procedure and Interpretation of Results:
-
Installation on Fedora:
Ventana de terminal sudo dnf install testdisk -y -
Execution:
Ventana de terminal sudo testdisk /run/media/user.portelcore/USB-Desti/imager-dd/imager-dd.000 -
Output Analysis:
La pantalla muestra una lista de particiones potenciales. Las teclas clave son:* **Flechas Arriba/Abajo:** Para seleccionar una partición.* **Flechas Izquierda/Derecha:** Para cambiar el estado de una partición (`D`=Borrada, `P`=Primaria, `L`=Lógica, `*`=Bootable). El objetivo es marcar las particiones correctas como `P`, `L` o `*` y dejar las incorrectas como `D`.* **`p` (minúscula):** Permite **previsualizar los archivos** de la partición seleccionada. Este es el paso de verificación más importante para confirmar que hemos escogido la partición correcta.* **`Enter`:** Para continuar una vez que la selección sea correcta.* **`[ Write ]`:** Para escribir la nueva tabla de particiones en la imagen de disco. Este paso es permanente.In our case, we will identify the partitions that match the output of fdisk and, through this process, we will be able to reconstruct a damaged partition table.
Part 2: Analysis and Mounting in Windows
Sección titulada «Parte 2: Análisis y Montaje en Windows»For analysis in Windows environments, we will use standard graphical tools in the forensic sector.
2.1. Analysis with FTK Imager
Sección titulada «2.1. Análisis con FTK Imager»AccessData FTK Imager is an essential and free forensic tool. It allows you to create disk images (evidence), preview the content of forensic images without altering them, and export files for deeper analysis.
Key Features:
- Integrity: We access images in read-only mode, preventing any accidental writing.
- Compatibility: Supports multiple image formats (
RAW/dd,E01,SMART, etc.). - Visualization: Shows a tree view of all files and folders, including unallocated space and deleted files (often marked with a red 'X').
Usage Procedure:
-
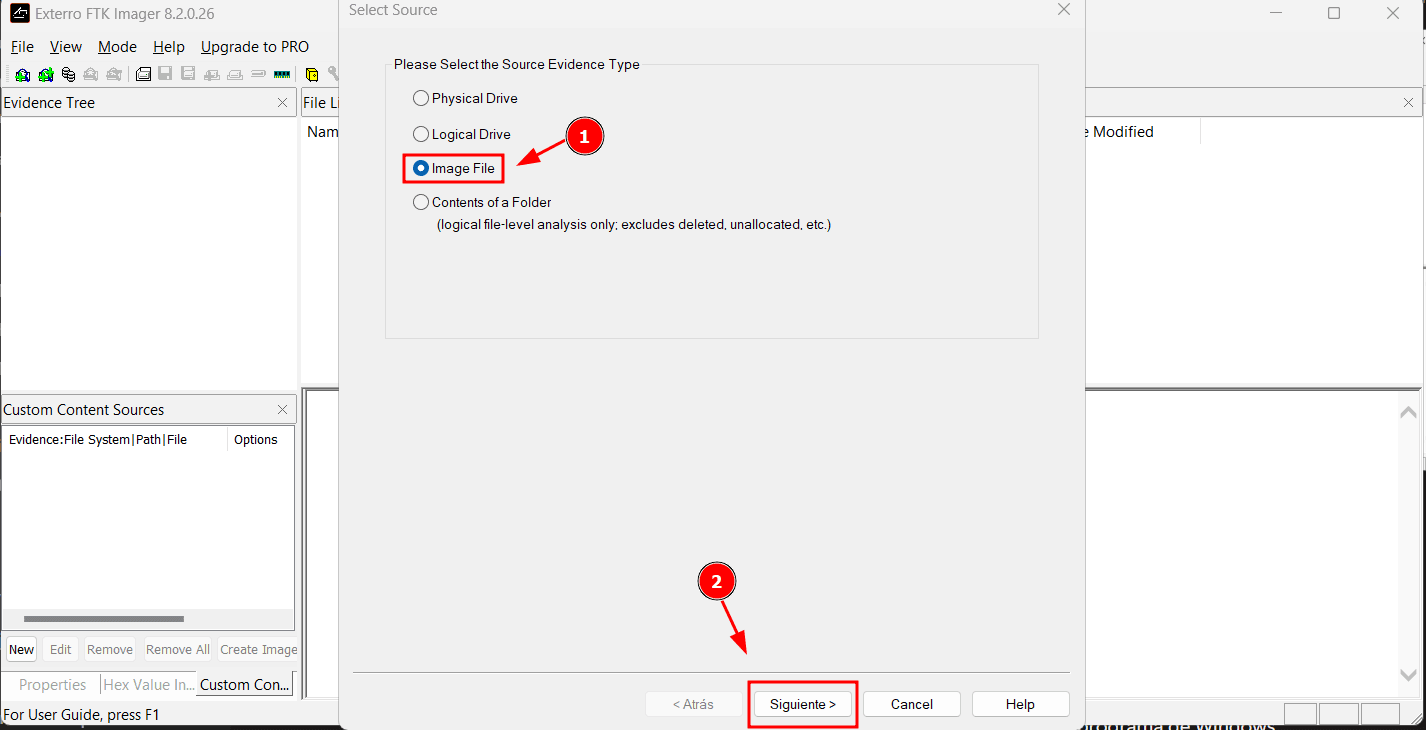
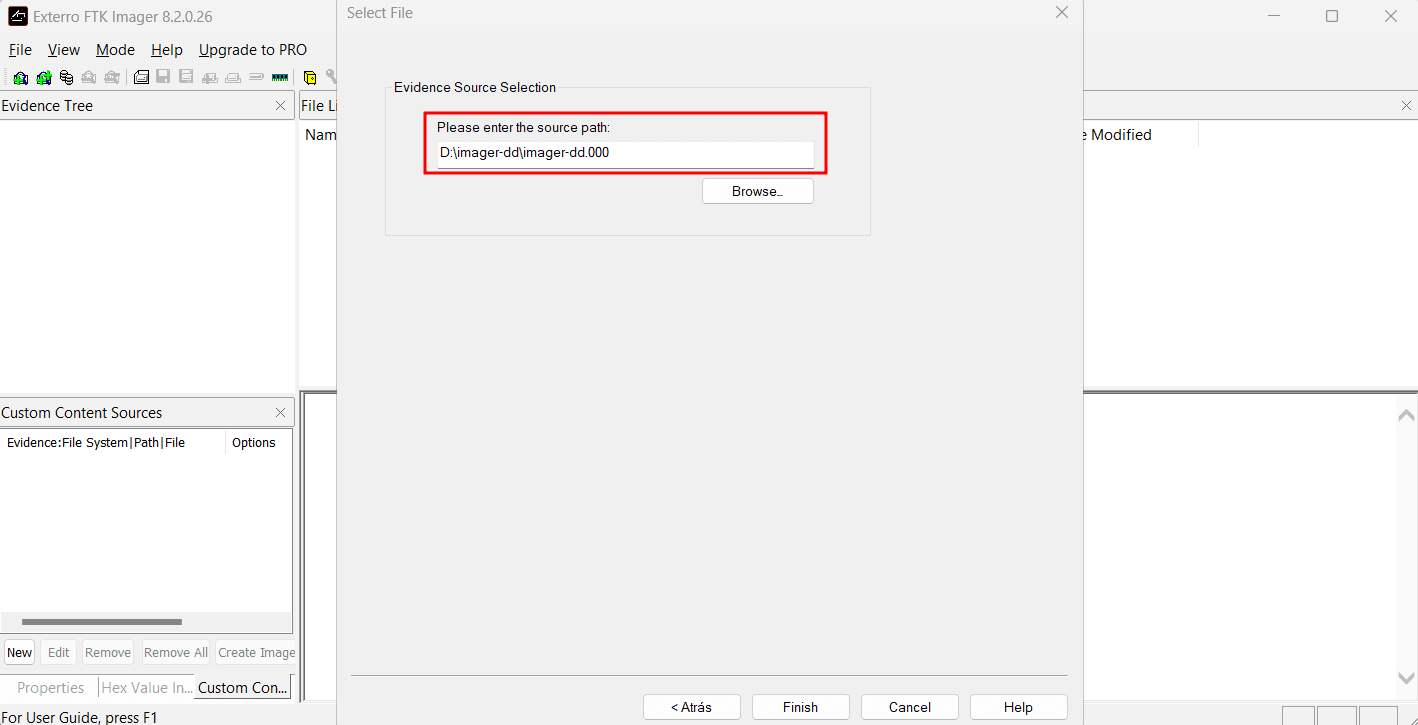
Load Evidence: In FTK Imager, we go to
Archivo > Agregar Elemento de Evidencia...and selectArchivo de Imagen. We navigate to the file.000or.E01.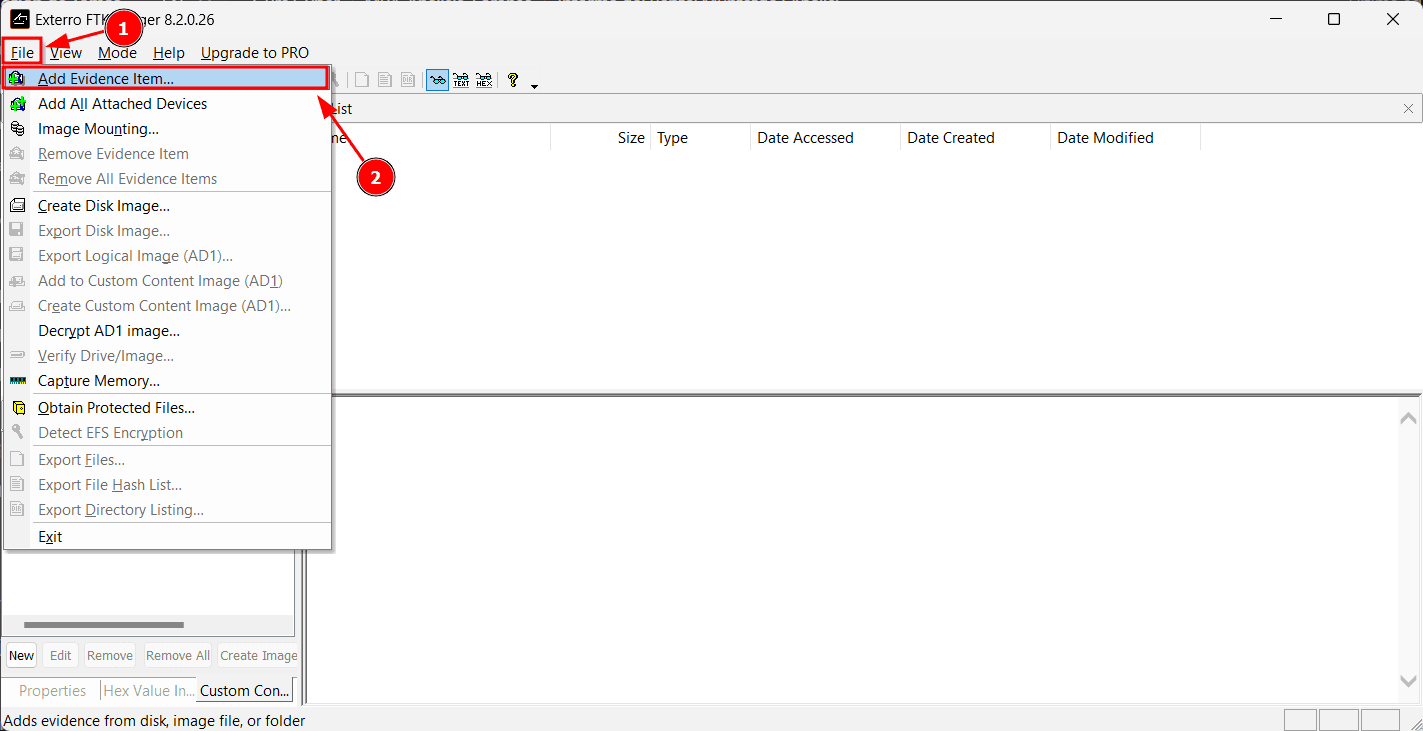
-
Exploration: The
Árbol de Evidenciawindow shows the detected partitions. By expanding them, we can navigate the directory structure as if it were Windows Explorer.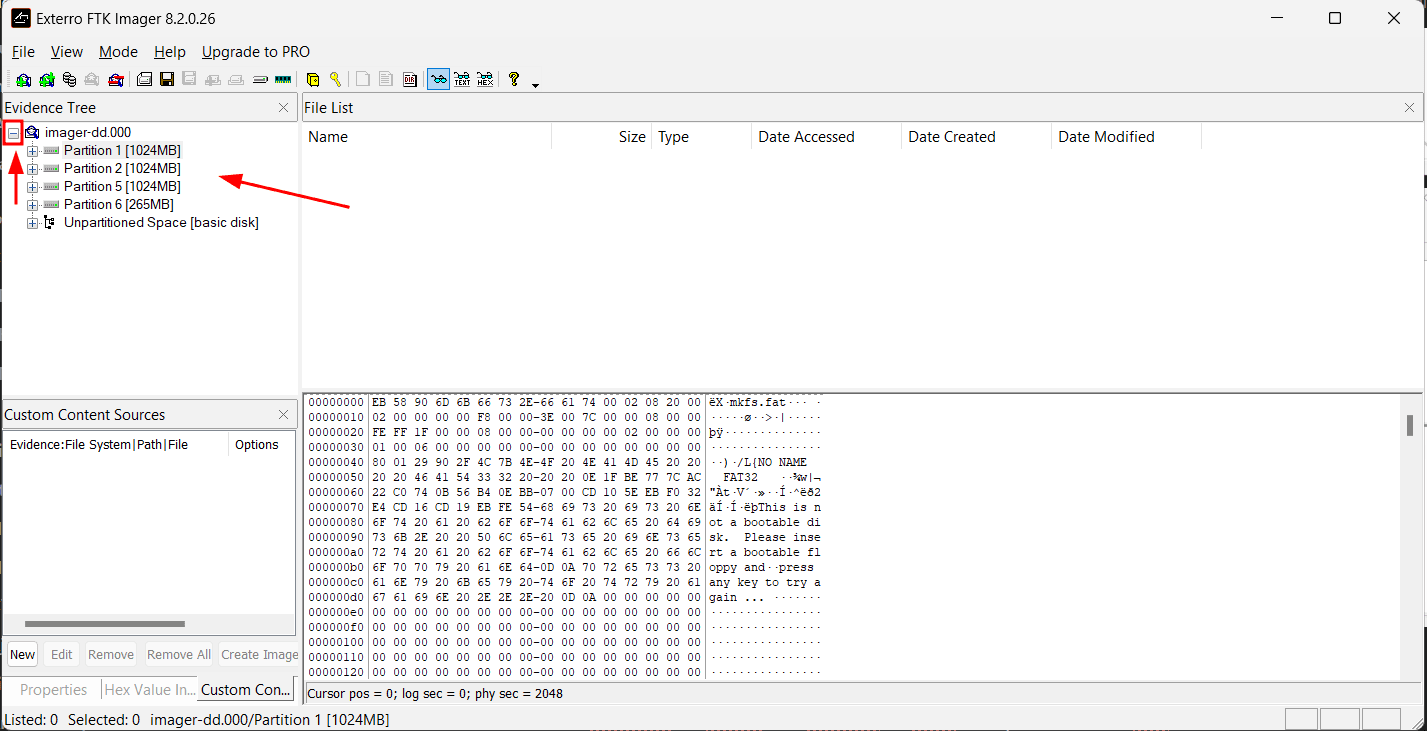
-
File Extraction: To extract a file or folder, right-click on it and select
Exportar Archivos.... This copies a replica to a safe location without modifying the original image.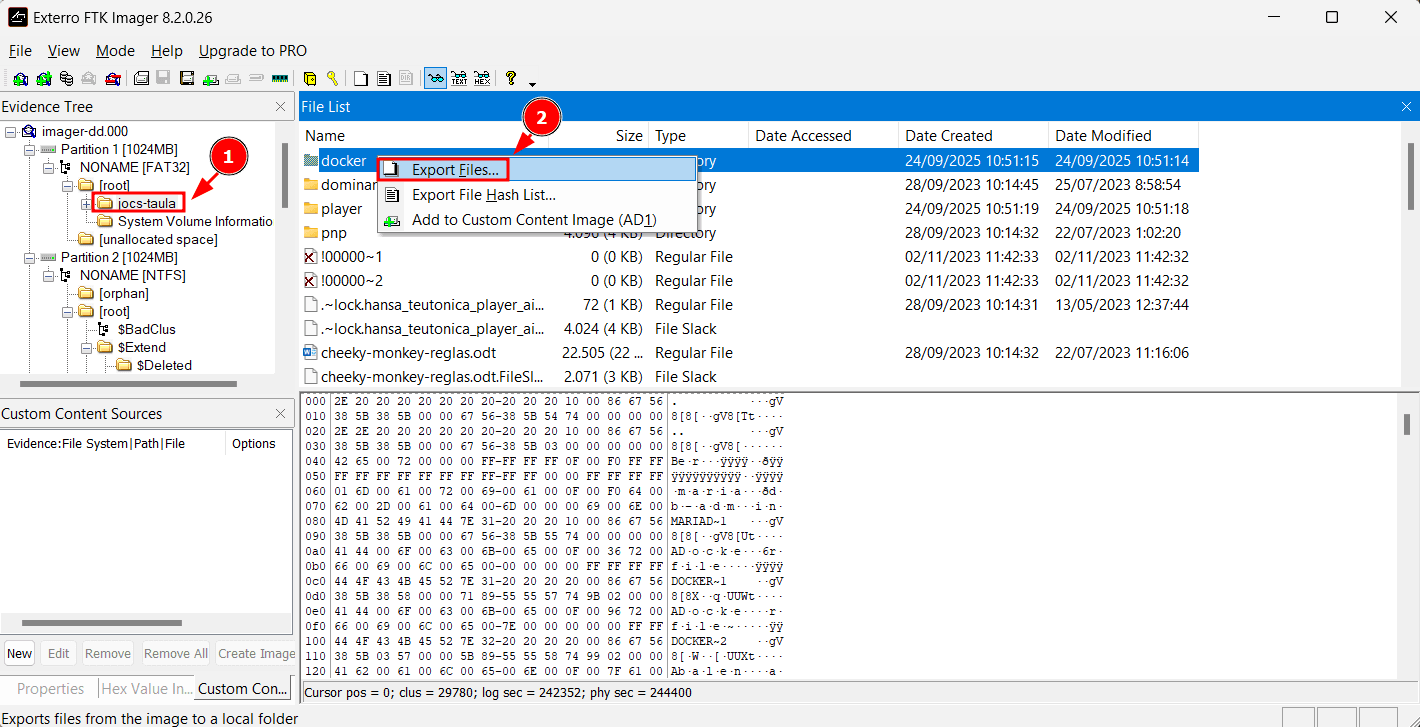
-
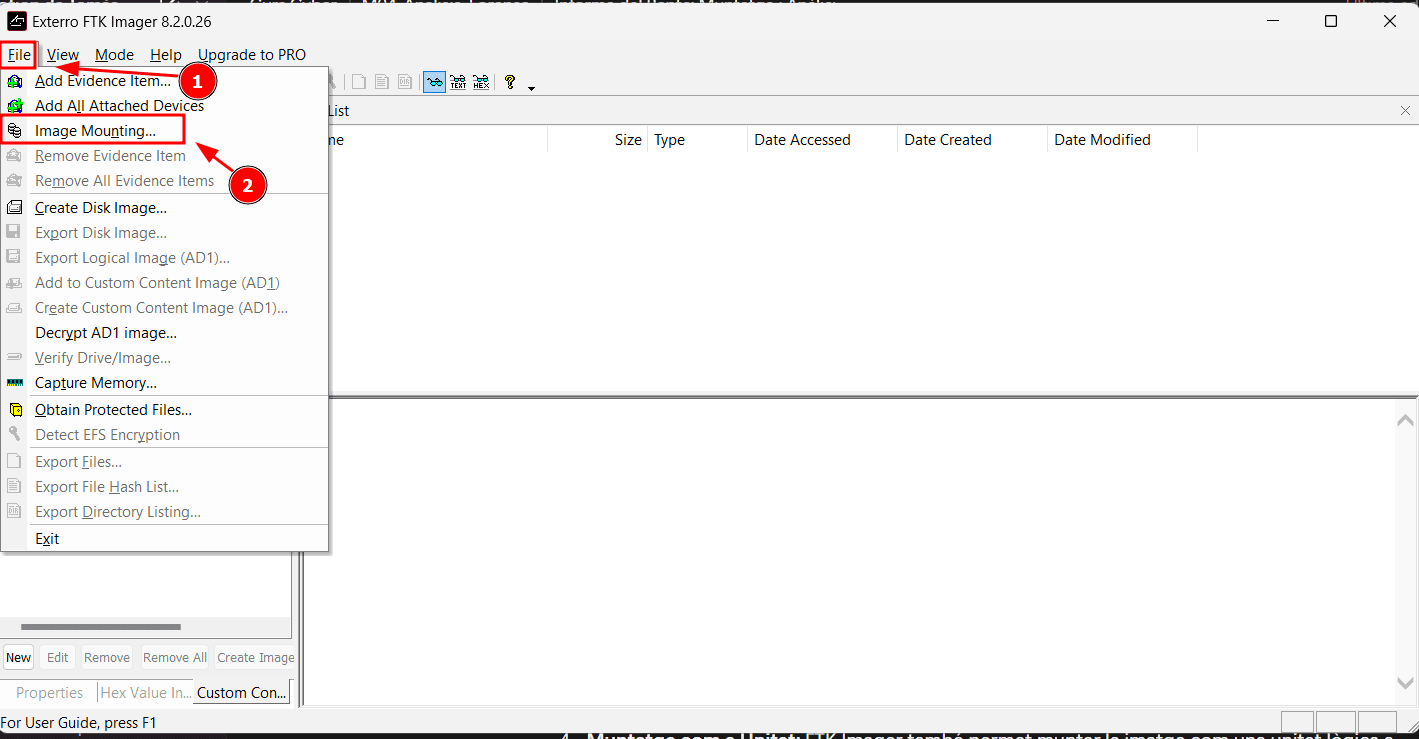
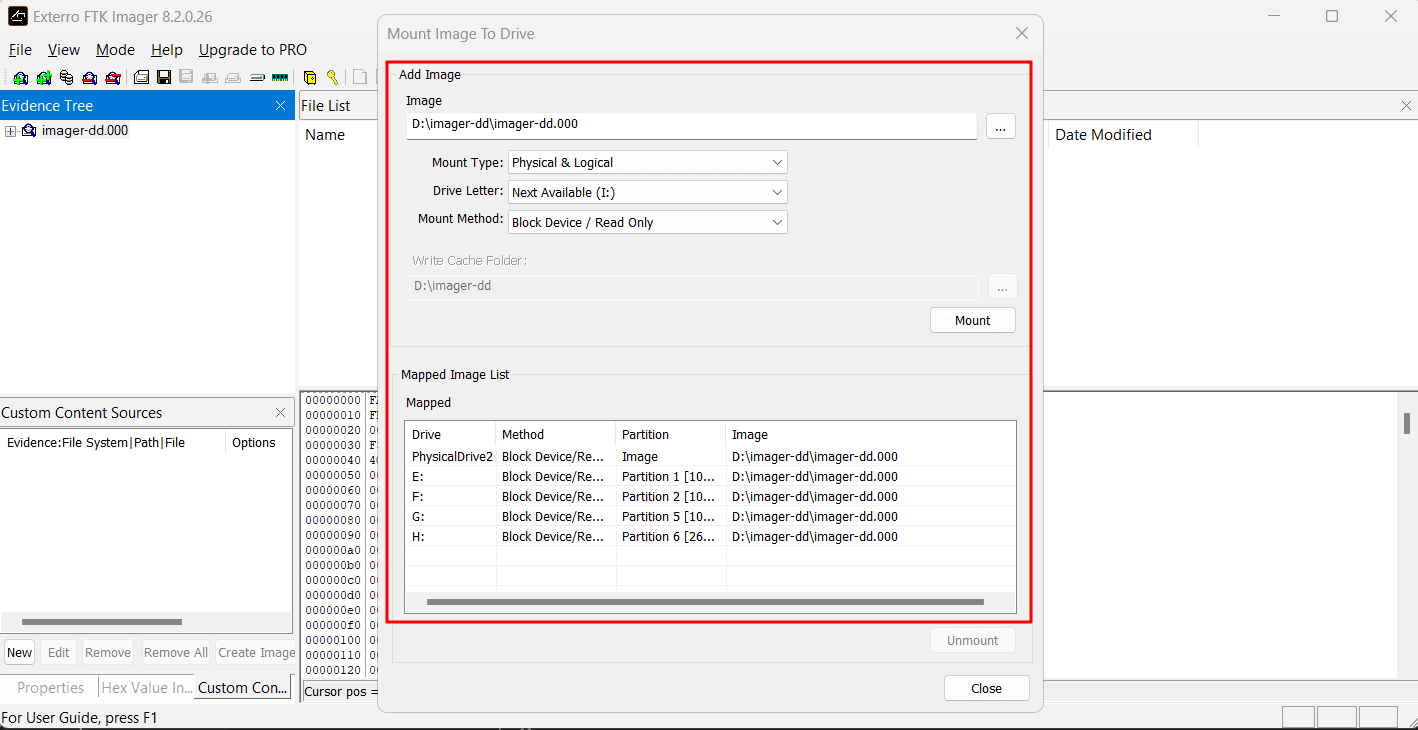
Mount as Drive: FTK Imager also allows mounting the image as a logical drive in Windows (
Archivo > Montaje de Imagen). The image appears as a new drive letter (e.g.,G:) in read-only mode, accessible from any Windows program.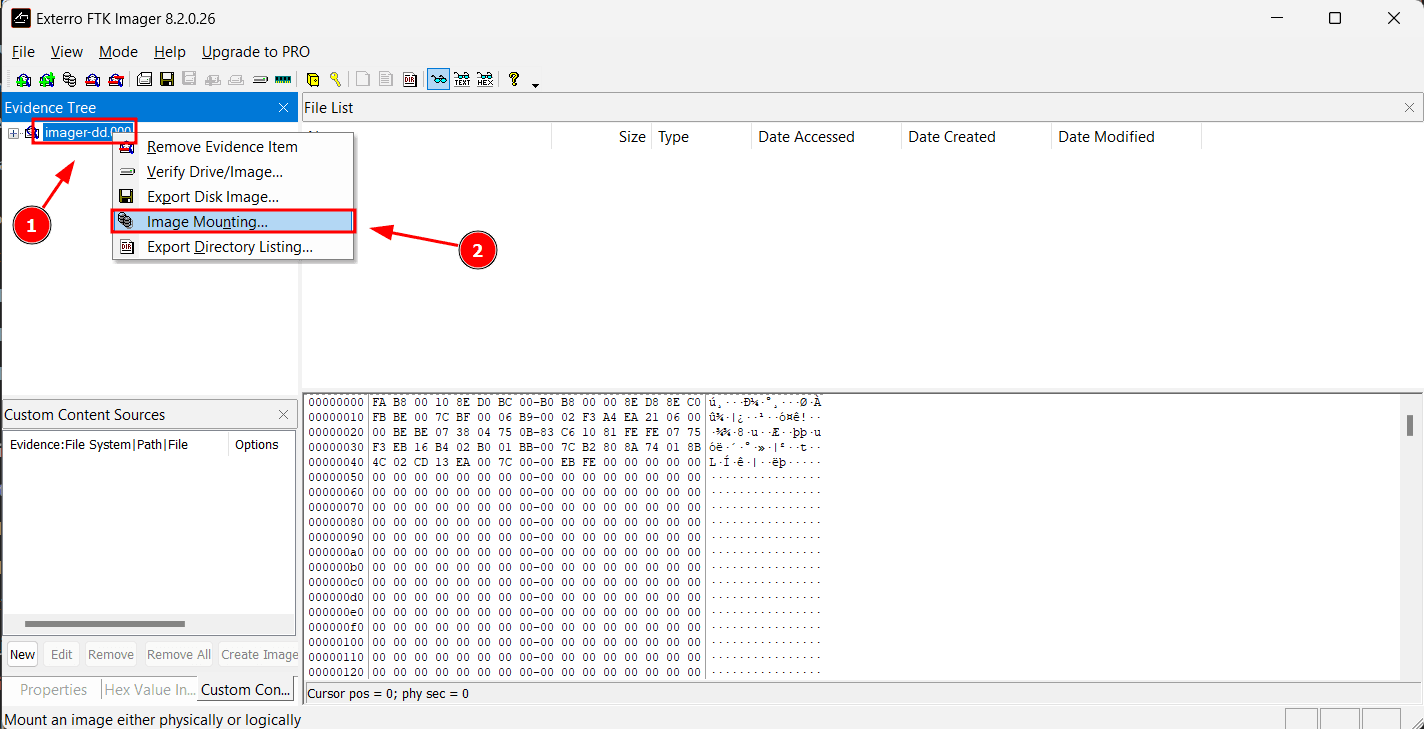
2.2. Mounting with Arsenal Image Mounter (AIM)
Sección titulada «2.2. Montaje con Arsenal Image Mounter (AIM)»Arsenal Image Mounter (AIM) is a tool that stands out for its ability to mount disk images at a very low level of the Windows operating system.
Key Features:
- Disk-Level Mounting: Unlike other tools that only mount volumes, AIM mounts the entire image as if it were a physical device (
SCSI). This allows other Windows tools (such asAdministración de Discos,chkdsk, or data recovery software) to interact with the image as if it were a real hard drive. - Windows Bypass: AIM can bypass certain interferences from the Windows operating system during mounting, which is useful for non-native or corrupt file systems.
Usage Procedure:
-
Open AIM and select
Montar Imagen de Disco. -
Select the Image File (
.000,.E01, etc.).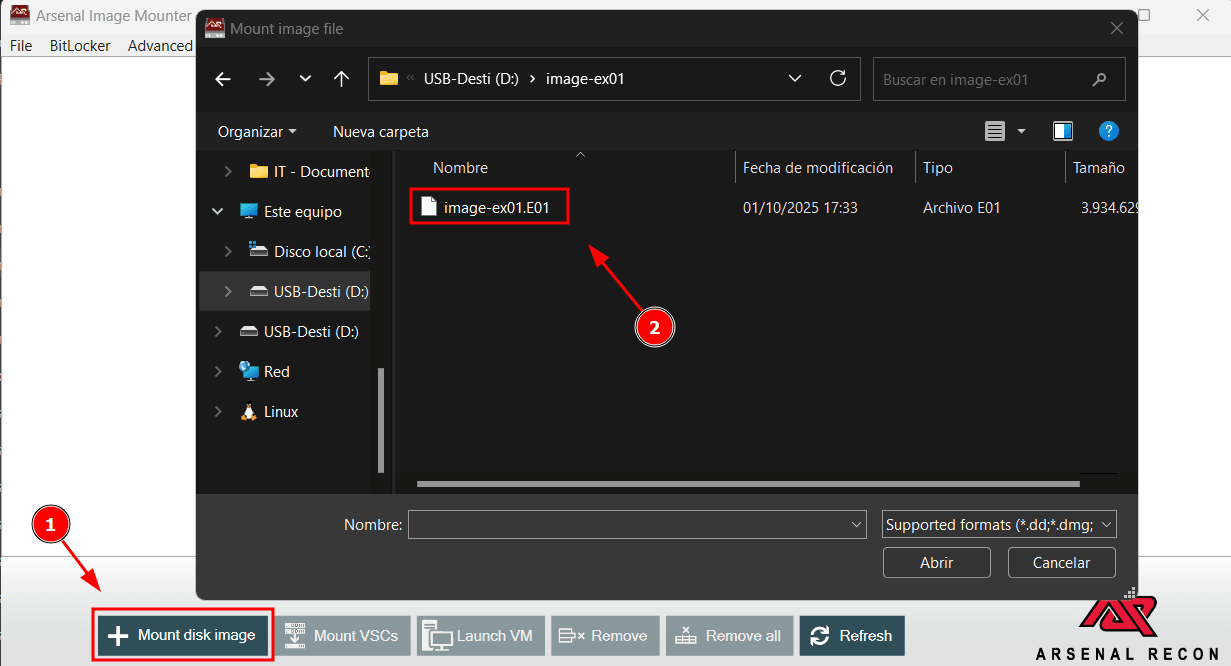
-
Configure Options: The most important option is to check the
Montaje de Solo Lecturabox for forensic analysis.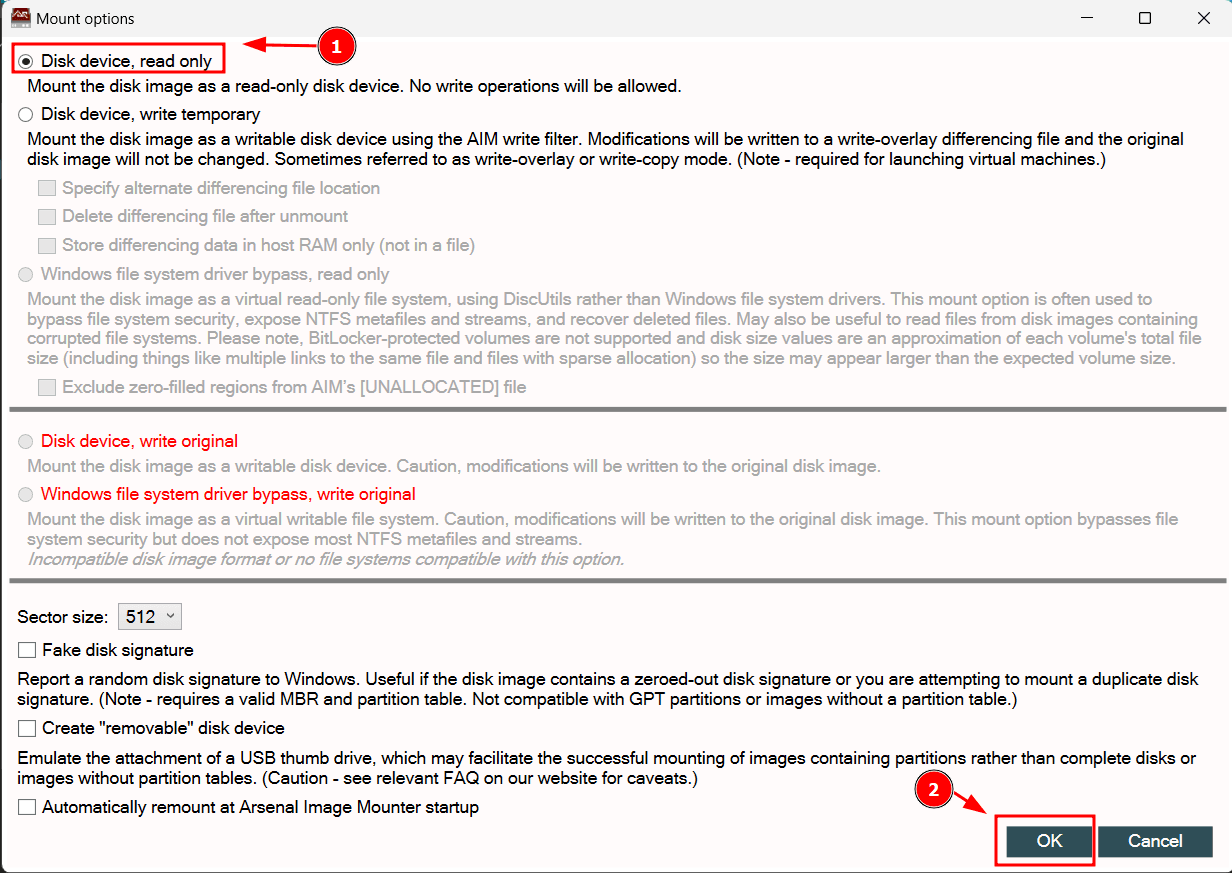
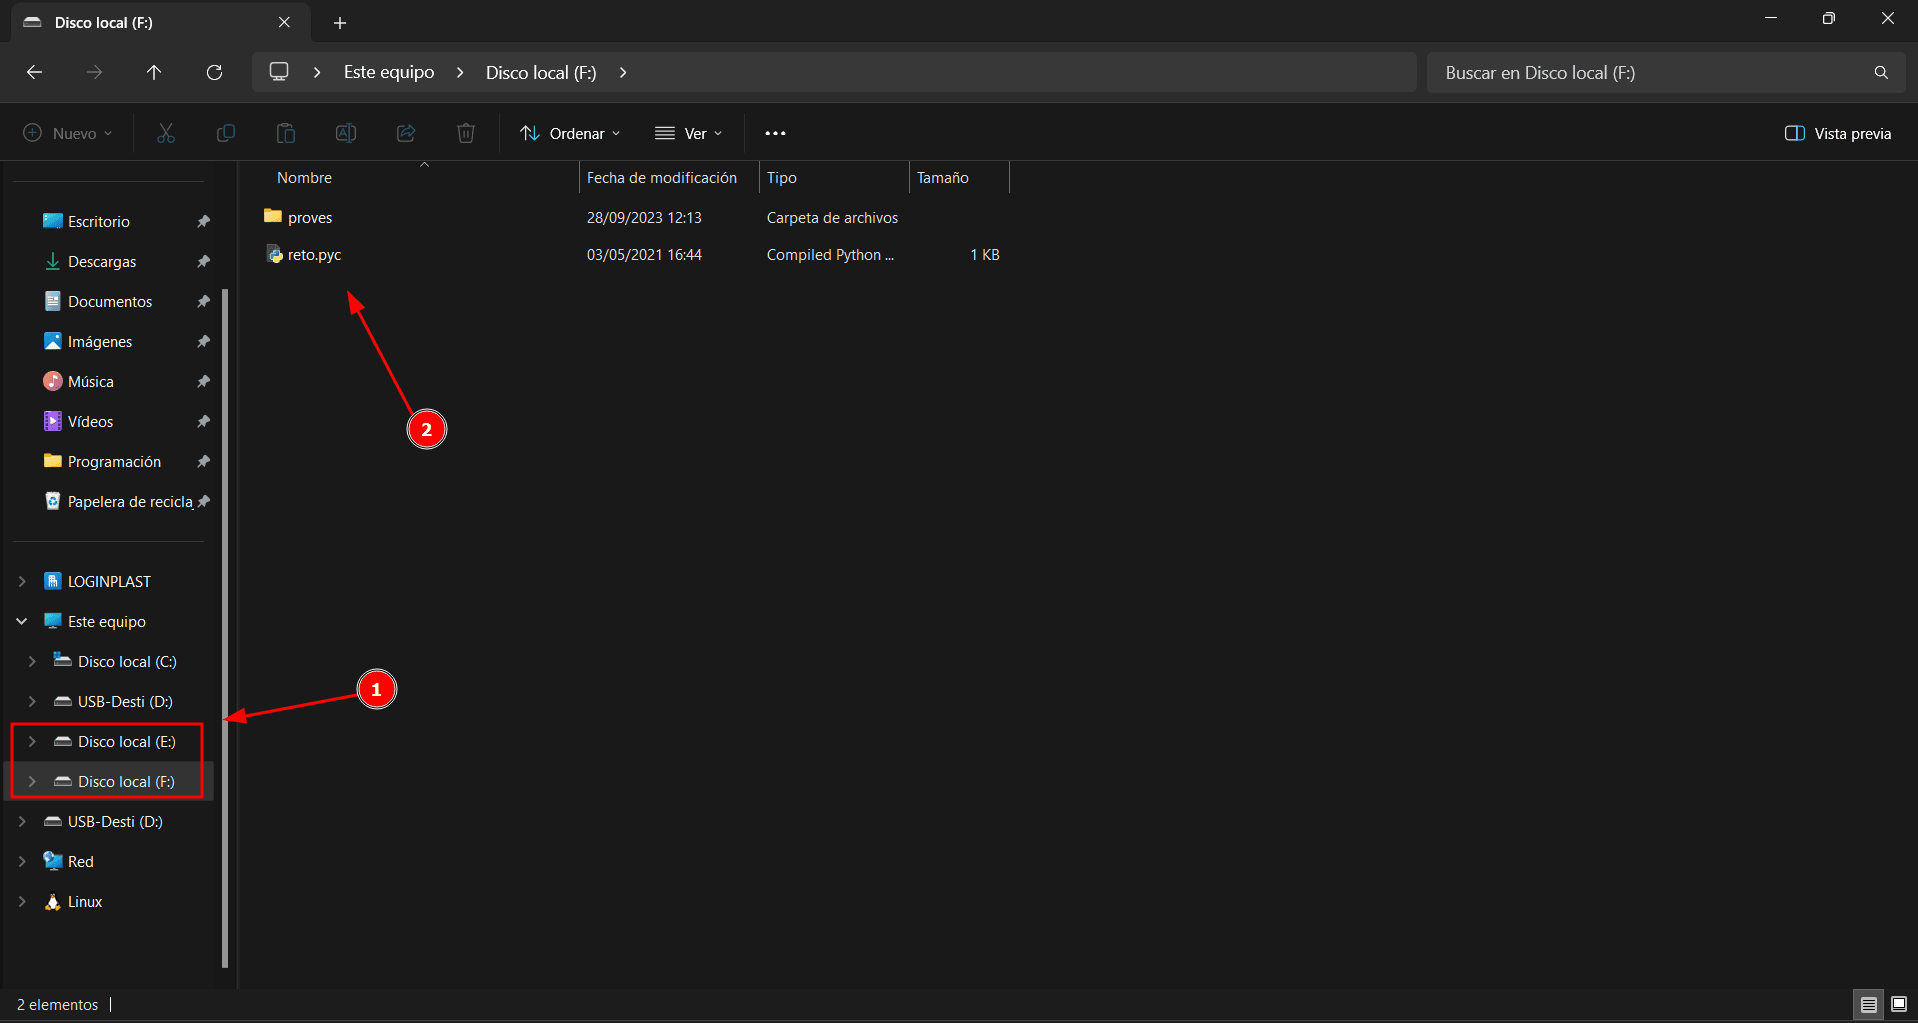
-
Access the Drive: Once mounted, the image appears in “This PC” and its content can be safely explored.
This practice has allowed us to perform a complete walkthrough of the fundamental techniques for mounting and analyzing forensic images. We have demonstrated the ability to operate in both Linux (Fedora) and Windows environments, using both command-line and graphical tools. Key concepts, such as read-only mounting, offset calculation, and the use of abstraction layers like ewfmount or qemu-nbd, have been successfully applied. Finally, the use of TestDisk has consolidated our knowledge of the internal structure of partition tables and recovery methods, thereby completing a comprehensive view of the forensic analysis process for storage media.