手动配置 WordPress 和数据库与 Trinux 路由器
此配置的关键在于子网掩码 /25(或 255.255.255.128)。该掩码将 172.26.0.0 网络划分为两个块:
名称: Portelcore 团队
课程: CE 网络安全 25/26
此配置的关键在于子网掩码 /25(或 255.255.255.128)。该掩码将 172.26.0.0 网络划分为两个块:
- Web 网络(块 1):
172.26.0.0/25(IP 从.1到.126) - 数据库网络(块 2):
172.26.0.128/25(IP 从.129到.254)
我们的计划是:
| 机器 | IP | 子网掩码 | 网关(出口) | 网络 |
|---|---|---|---|---|
| Ubuntu 网站(WP) | 172.26.0.20 | /25 | 172.26.0.1 | 网站网络(1) |
| Ubuntu 数据库 (MySQL) | 172.26.0.150 | /25 | 172.26.0.129 | 红色数据库 (2) |
| Trinux (路由器) | 172.26.0.1 (eth0) | /25 | - | 连接到网络1 |
| Trinux (路由器) | 172.26.0.129 (eth1) | /25 | - | 连接到网络2 |
我们必须遵循此顺序。Ubuntu 服务器在路由器(步骤3)运行之前无法通信。
- 步骤3:配置 Trinux 路由器
- 步骤4:配置 Ubuntu 数据库
- 步骤5:配置 Ubuntu 网站 (WP)
3. 步骤1:Trinux 路由器配置
Sección titulada «3. Paso 1: Configuración del Router Trinux»我们将连接到 Trinux 机器。
我们将为路由器的每个网关分配一个 IP。掩码 255.255.255.128 等同于 /25。
# Pata conectada a la red del Servidor Web (Red 1)# Esta será la puerta de enlace (gateway) para 172.26.0.20ifconfig eth1 172.26.0.1 netmask 255.255.255.128 up
# Pata conectada a la red del Servidor BBDD (Red 2)# Esta será la puerta de enlace (gateway) para 172.26.0.150ifconfig eth0 172.26.0.129 netmask 255.255.255.128 up
3.2. 启用IP转发 (IP Forwarding)
Sección titulada «3.2. Activar Enrutamiento (IP Forwarding)»这是将 Trinux 变为路由器的命令。
echo "1" > /proc/sys/net/ipv4/ip_forward3.3. 配置 IPTables (允许流量)
Sección titulada «3.3. Configurar IPTables (Permitir tráfico)»默认情况下,我们将规则放在 DROP。我们将确保两个内部网络之间的流量被允许。
# --- 2. REGLAS IPTABLES (NAT - Network Address Translation) ---
# Vaciamos reglas NAT por si acasoiptables -t nat -F PREROUTINGiptables -t nat -F POSTROUTING
# REGLA NAT 1: MASQUERADE (SNAT)# Permite que las dos redes internas (Web y BBDD) salgan a Internet# "enmascaradas" bajo la IP pública de eth0.iptables -t nat -A POSTROUTING -o eth0 -j MASQUERADE
# REGLA NAT 2: PORT FORWARDING (DNAT) para HTTP (Port 80)# Todo lo que entre por la pública (eth0) al puerto 80...# ...se redirige a nuestro Servidor Web (172.26.0.20).iptables -t nat -A PREROUTING -i eth0 -p tcp --dport 80 -j DNAT --to-destination 172.26.0.20:80
# REGLA NAT 3: PORT FORWARDING (DNAT) para HTTPS (Port 443)iptables -t nat -A PREROUTING -i eth0 -p tcp --dport 443 -j DNAT --to-destination 172.26.0.20:443
# Ocultar la red BBDD detrás de la IP de la red Web.iptables -t nat -A POSTROUTING -o eth1 -j MASQUERADE
# --- 3. REGLAS IPTABLES (FORWARD - Filtrado de Paquetes) ---
# Vaciamos reglas FORWARDiptables -F FORWARD
# REGLA FORWARD 1: Política por Defecto# Cerramos TODO el tráfico que quiera cruzar el router.iptables -P FORWARD DROP
# REGLA FORWARD 2: Permitir Conexiones Establecidas# Permite que los paquetes de RESPUESTA vuelvan.iptables -A FORWARD -m state --state ESTABLISHED,RELATED -j ACCEPT
# REGLA FORWARD 3: Permitir el Port Forwarding# Permitimos explícitamente que los paquetes (HTTP/S) que hemos# redirigido antes (DNAT) puedan llegar al Servidor Web.iptables -A FORWARD -i eth0 -o eth1 -p tcp --dport 80 -d 172.26.0.20 -j ACCEPTiptables -A FORWARD -i eth0 -o eth1 -p tcp --dport 443 -d 172.26.0.20 -j ACCEPT
# REGLA FORWARD 4: Permitir Web -> BBDD (MySQL)# Permite que SOLO el Servidor Web (172.26.0.20)...# ...se conecte al Servidor BBDD (172.26.0.150) al puerto 3306.iptables -A FORWARD -i eth1 -s 172.26.0.20 -o eth2 -d 172.26.0.150 -p tcp --dport 3306 -j ACCEPT
# REGLA FORWARD 5: Permitir a las Redes Internas salir a Internet# Permite que tanto la Red Web (eth1) como la BBDD (eth2)# puedan iniciar conexiones hacia Internet (p.ej. para actualizaciones).iptables -A FORWARD -i eth1 -o eth0 -j ACCEPTiptables -A FORWARD -i eth2 -o eth0 -j ACCEPT
Trinux 路由器已准备就绪。
4. 步骤2:Ubuntu 数据库配置 (172.26.0.150)
Sección titulada «4. Paso 2: Configuración del Ubuntu BBDD (172.26.0.150)»我们将连接到作为数据库的 Ubuntu 服务器。
4.1. 配置静态IP (Netplan)
Sección titulada «4.1. Configurar IP Estática (Netplan)»首先,使用以下命令确定接口名称(例如:ens33、eth0):
ip a
现在,我们将使用 sudo 编辑 Netplan 配置文件。
user.portelcore@ubuntu-BBDD:~$ sudo nano /etc/netplan/50-cloud-init.yaml文件内容如下。
network: version: 2 ethernets: enp0s3: dhcp4: true enp0s8: dhcp4: no addresses: - 172.26.0.150/25 routes: - to: default via: 172.26.0.129 nameservers: addresses: [8.8.8.8, 1.1.1.1]我们将验证IP是否正确:
user.portelcore@ubuntu-bbdd:~$ ip a1: lo: <LOOPBACK,UP,LOWER_UP> mtu 65536 qdisc noqueue state UNKNOWN group default qlen 1000    link/loopback 00:00:00:00:00:00 brd 00:00:00:00:00:00    inet 127.0.0.1/8 scope host lo       valid_lft forever preferred_lft forever    inet6 ::1/128 scope host noprefixroute       valid_lft forever preferred_lft forever2: enp0s3: <BROADCAST,MULTICAST,UP,LOWER_UP> mtu 1500 qdisc fq_codel state UP group default qlen 1000    link/ether 06:00:27:a8:9d:4e brd ff:ff:ff:ff:ff:ff    inet 172.18.33.171/24 metric 100 brd 172.18.33.255 scope global dynamic enp0s3       valid_lft 6999sec preferred_lft 6999sec    inet6 fe80::400:27ff:fea8:9d4e/64 scope link       valid_lft forever preferred_lft forever3: enp0s8: <BROADCAST,MULTICAST> mtu 1500 qdisc noop state DOWN group default qlen 1000    link/ether 06:00:27:15:e4:03 brd ff:ff:ff:ff:ff:ff
user.portelcore@ubuntu-bbdd:~$ sudo netplan applyuser.portelcore@ubuntu-bbdd:~$ sudo ip link set enp0s8 upuser.portelcore@ubuntu-bbdd:~$ ip a1: lo: <LOOPBACK,UP,LOWER_UP> mtu 65536 qdisc noqueue state UNKNOWN group default qlen 1000    link/loopback 00:00:00:00:00:00 brd 00:00:00:00:00:00    inet 127.0.0.1/8 scope host lo       valid_lft forever preferred_lft forever    inet6 ::1/128 scope host noprefixroute       valid_lft forever preferred_lft forever2: enp0s3: <BROADCAST,MULTICAST,UP,LOWER_UP> mtu 1500 qdisc fq_codel state UP group default qlen 1000    link/ether 06:00:27:a8:9d:4e brd ff:ff:ff:ff:ff:ff    inet 172.18.33.171/24 metric 100 brd 172.18.33.255 scope global dynamic enp0s3       valid_lft 6763sec preferred_lft 6763sec    inet6 fe80::400:27ff:fea8:9d4e/64 scope link       valid_lft forever preferred_lft forever3: enp0s8: <BROADCAST,MULTICAST,UP,LOWER_UP> mtu 1500 qdisc fq_codel state UP group default qlen 1000    link/ether 06:00:27:15:e4:03 brd ff:ff:ff:ff:ff:ff    inet 172.26.0.150/25 brd 172.26.0.255 scope global enp0s8       valid_lft forever preferred_lft forever    inet6 fe80::400:27ff:fe15:e403/64 scope link       valid_lft forever preferred_lft foreveruser.portelcore@ubuntu-bbdd:~$
4.2. 安装和配置 MariaDB
Sección titulada «4.2. Instalar y Configurar MariaDB»user.portelcore@ubuntu-bbdd:~$ sudo apt updateuser.portelcore@ubuntu-bbdd:~$ sudo apt install -y mariadb-server4.3. 配置 MariaDB 的远程访问
Sección titulada «4.3. Configurar el Acceso Remoto a MariaDB»我们必须告诉 MariaDB 接受对其 IP 的连接,而不仅仅是 localhost。
user.portelcore@ubuntu-bbdd:~$ sudo nano /etc/mysql/mariadb.conf.d/50-server.cnf我们将查找 bind-address = 127.0.0.1 这一行,并将其更改为:
bind-address = 172.26.0.150保存文件并重启 MariaDB 服务:
user.portelcore@ubuntu-bbdd:~$ sudo systemctl restart mariadbuser.portelcore@ubuntu-bbdd:~$ sudo systemctl enable --now mariadbSynchronizing state of mariadb.service with SysV service script with /usr/lib/systemd/systemd-sysv-install.Executing: /usr/lib/systemd/systemd-sysv-install enable mariadbuser.portelcore@ubuntu-bbdd:~$4.4. 创建数据库和用户
Sección titulada «4.4. Crear la BBDD y el Usuario»进入 MariaDB 控制台:
user.portelcore@ubuntu-bbdd:~$ sudo mariadb -u root我们将执行 SQL 命令。这些命令创建数据库,并仅允许用户 ‘user.portelcore’ 从 Web 服务器 IP(172.26.0.20)进行访问。
user.portelcore@ubuntu-bbdd:~$ sudo mariadb -u rootWelcome to the MariaDB monitor.  Commands end with ; or \g.Your MariaDB connection id is 31Server version: 10.11.13-MariaDB-0ubuntu0.24.04.1 Ubuntu 24.04
Copyright (c) 2000, 2018, Oracle, MariaDB Corporation Ab and others.
Type 'help;' or '\h' for help. Type '\c' to clear the current input statement.
MariaDB [(none)]> CREATE DATABASE wordpress_db;Query OK, 1 row affected (0,001 sec)
MariaDB [(none)]> GRANT ALL PRIVILEGES ON wordpress_db.* TO 'user.portelcore'@'172.26.0.20' IDENTIFIED BY 'P@ssw0rd';Query OK, 0 rows affected (0,010 sec)
MariaDB [(none)]> FLUSH PRIVILEGES;Query OK, 0 rows affected (0,001 sec)
MariaDB [(none)]> EXIT;Byeuser.portelcore@ubuntu-bbdd:~$
数据库服务器已准备就绪。
5. 步骤3:Ubuntu 网站配置 (172.26.0.20)
Sección titulada «5. Paso 3: Configuración del Ubuntu Web (172.26.0.20)»我们将连接到作为 WordPress 的 Ubuntu 服务器。
5.1. 配置静态IP (Netplan)
Sección titulada «5.1. Configurar IP Estática (Netplan)»与之前一样,使用 ip a 确定接口名称。
user.portelcore@ubuntu-web:~$ ip auser.portelcore@ubuntu-web:~$ sudo nano /etc/netplan/50-cloud-init.yaml我们将粘贴此内容。请注意网关不同(.1):
network: version: 2 ethernets: enp0s3: dhcp4: true enp0s8: dhcp4: no addresses: - 172.26.0.20/25 routes: - to: default via: 172.26.0.129 nameservers: addresses: [8.8.8.8, 1.1.1.1]应用配置:
user.portelcore@ubuntu-web:~$ sudo netplan applyuser.portelcore@ubuntu-web:~$ ip a1: lo: <LOOPBACK,UP,LOWER_UP> mtu 65536 qdisc noqueue state UNKNOWN group default qlen 1000 link/loopback 00:00:00:00:00:00 brd 00:00:00:00:00:00 inet 127.0.0.1/8 scope host lo valid_lft forever preferred_lft forever inet6 ::1/128 scope host noprefixroute valid_lft forever preferred_lft forever2: enp0s3: <BROADCAST,MULTICAST,UP,LOWER_UP> mtu 1500 qdisc fq_codel state UP group default qlen 1000 link/ether 08:00:27:c3:4e:ed brd ff:ff:ff:ff:ff:ff inet 172.18.33.171/24 metric 100 brd 172.18.33.255 scope global dynamic enp0s3 valid_lft 6747sec preferred_lft 6747sec inet6 fe80::a00:27ff:fec3:4eed/64 scope link valid_lft forever preferred_lft forever3: enp0s8: <BROADCAST,MULTICAST,UP,LOWER_UP> mtu 1500 qdisc fq_codel state UP group default qlen 1000 link/ether 08:00:27:80:64:e4 brd ff:ff:ff:ff:ff:ff inet 172.26.0.20/25 brd 172.26.0.127 scope global enp0s8 valid_lft forever preferred_lft forever inet6 fe80::a00:27ff:fe80:64e4/64 scope link valid_lft forever preferred_lft foreveruser.portelcore@ubuntu-web:~$5.2. 安装 Apache、PHP 和 WordPress
Sección titulada «5.2. Instalar Apache, PHP y WordPress»user.portelcore@ubuntu-web:~$ sudo apt updateuser.portelcore@ubuntu-web:~$ sudo apt install -y apache2 php libapache2-mod-php php-mysql wget现在下载并准备 WordPress:
# Descarregar a /tmpuser.portelcore@ubuntu-web:~$ sudo wget https://wordpress.org/latest.tar.gz -P /tmp
# Descomprimir al directori web (esborrant l'index.html d'Apache)user.portelcore@ubuntu-web:~$ sudo rm /var/www/html/index.htmluser.portelcore@ubuntu-web:~$ sudo tar -xzvf /tmp/latest.tar.gz -C /var/www/html --strip-components=1
# Netejaruser.portelcore@ubuntu-web:~$ sudo rm /tmp/latest.tar.gz
5.3. 配置 wp-config.php
Sección titulada «5.3. Configurar wp-config.php»从示例创建 WordPress 配置文件:
# Copiamos el ejemplouser.portelcore@ubuntu-web:~$ sudo cp /var/www/html/wp-config-sample.php /var/www/html/wp-config.php
# Lo editamosuser.portelcore@ubuntu-web:~$ sudo nano /var/www/html/wp-config.php
修改这些关键行。
// .../** The name of the database for WordPress */define( 'DB_NAME', 'wordpress_db' );
/** MySQL database username */define( 'DB_USER', 'user.portelcore' );
/** MySQL database password */define( 'DB_PASSWORD', 'P@ssw0rd' );
/** MySQL hostname */define( 'DB_HOST', '172.26.0.150' );// ...
5.4. 调整权限并重启Apache
Sección titulada «5.4. Ajustar Permisos y Reiniciar Apache»最后,我们将权限授予网络服务器上的文件:
user.portelcore@ubuntu-web:~$ sudo chown -R www-data:www-data /var/www/html
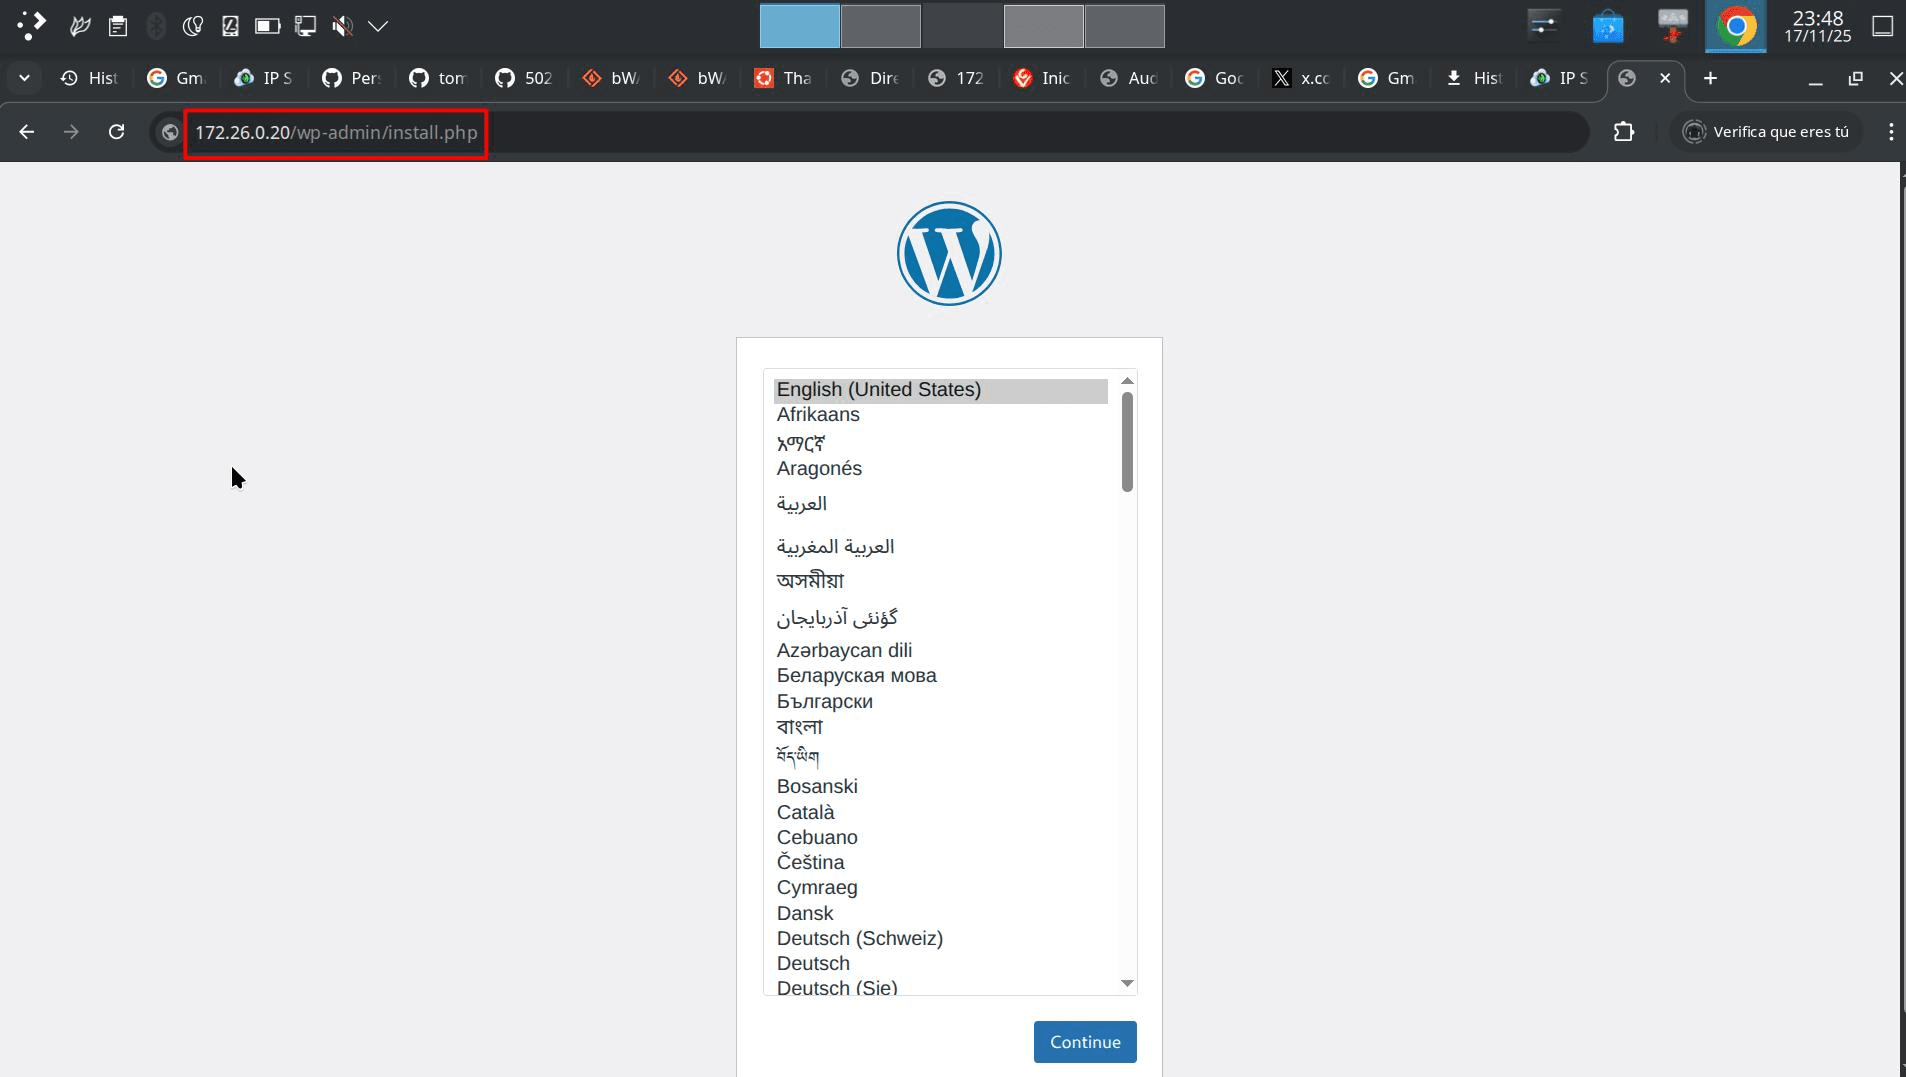
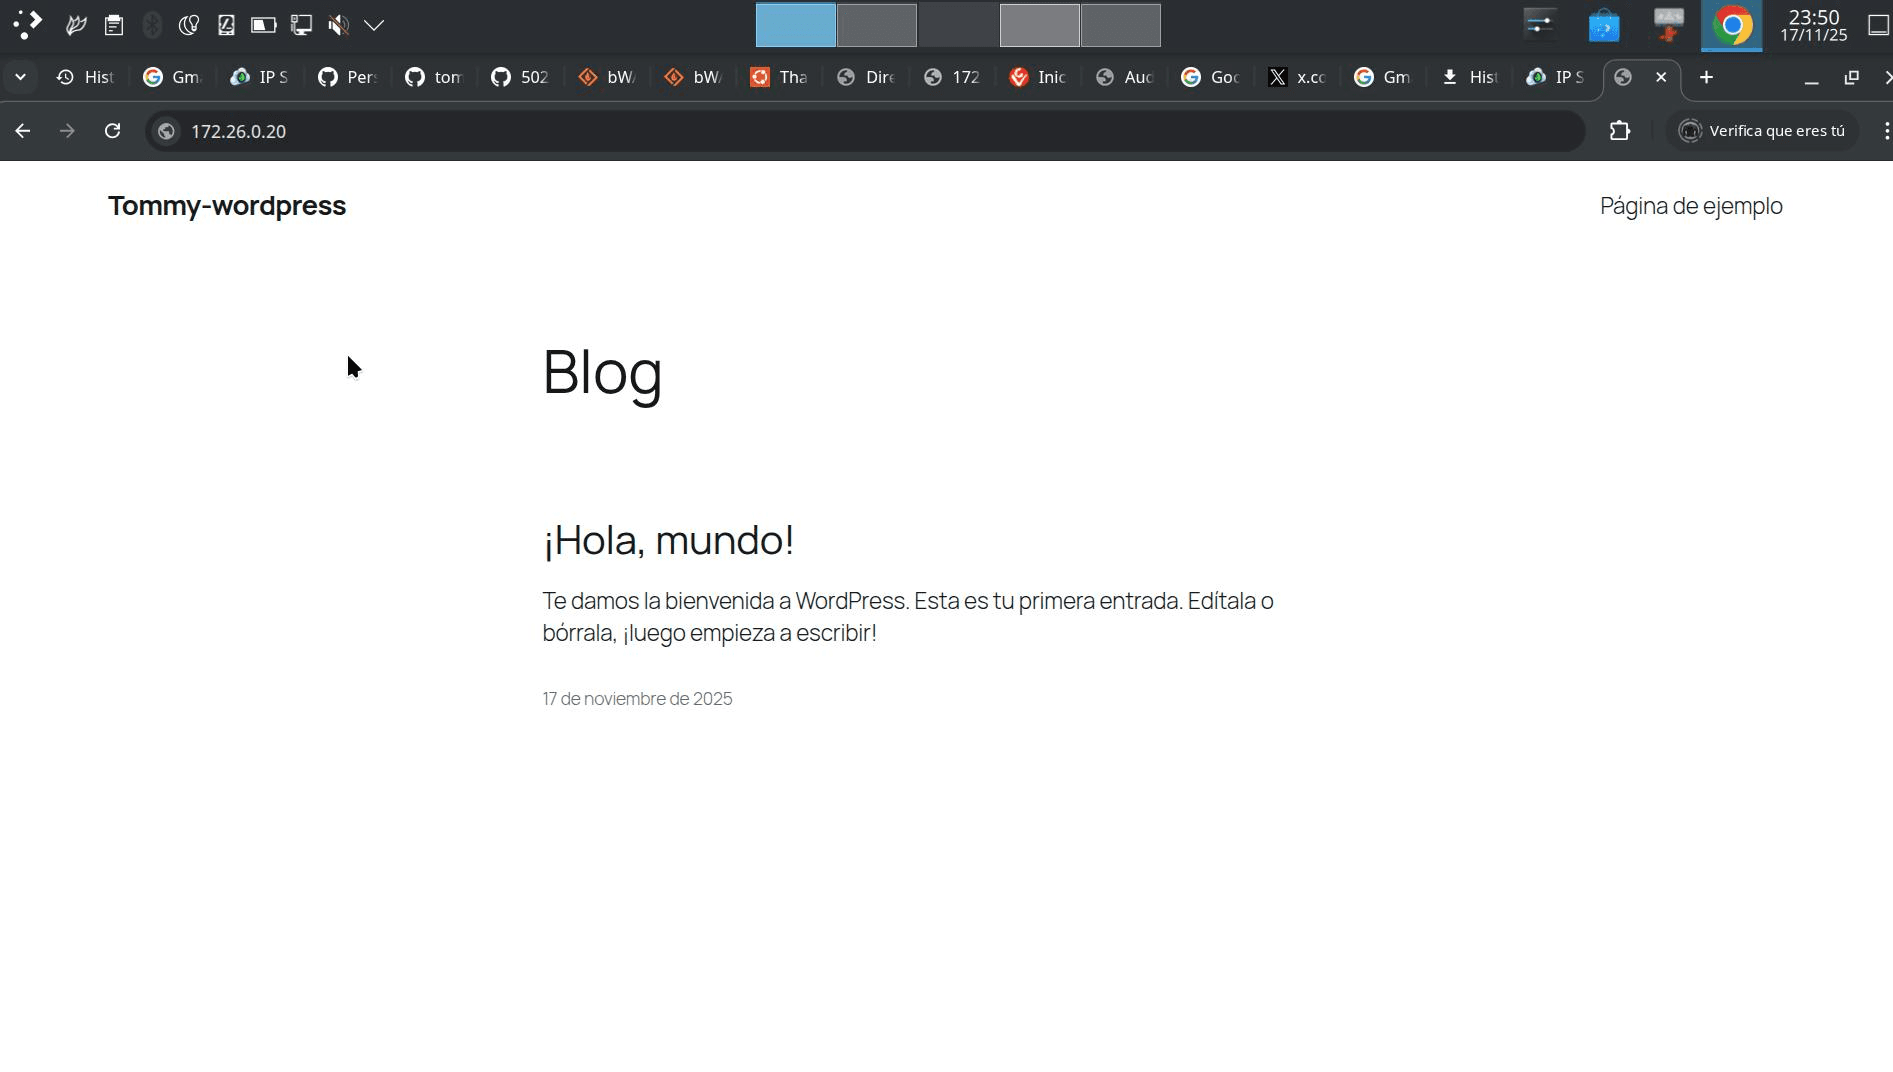
user.portelcore@ubuntu-web:~$ sudo systemctl restart apache2现在,为了验证,我们将前往浏览器并查看是否允许我们访问WordPress。
因此,我们将在 http://172.26.0.20: 地址打开 Web 浏览器